How to Work with a Tracked Scene
1. When you run a new project, the user interface is displayed by default in the Trigger module.
- Note that it appears empty, which means that no scenes have been created in the Qimera project so far.
- To create a new scene, go to the composition module

2. This panel appears only for the first scene in your project; after that, you can create scenes directly from the Scene Selection Panel.
In this panel you can select the type of scene you want, Trackless Scene or Tracked Scene.
Then select Tracked Scene

3. At this point you are in the Composition module, this is where you will create the composition of the scene (Understanding the composition module)
By default Tracked scene is the name of the new scene previously created, you can create a New Scene with your custom name by clicking in the plus icon.

4. Once the panel appears you will see these 3 fields
- Scene Name: You can type any name you like. Lets add Scene Cam1 as example.
- Keep Saves: Here you can decide whether you want to have default values for the new scene leaving the dot on the left (Switch in OFF mode) or copy all the data from the current scene to the new one leaving the dot on the right (Switch in ON Mode). Lets Keep saves Off as example
- Confirm to create the new scene

5. Then open The Scene Selection List and select the new scene

6. At this point we have created a new scene with a custom name and default values.

7. There 4 elements that you need to connect in order to have a correct Tracked Scene Composition
- Camera Feed: Link the video signal coming from the real camera with the new scene
- Tracker System: Link the preset containing all the data from the tracker connected to the real camera with the new scene
- Coordinates: Link the preset that contains the coordinate in the virtual world with the new scene
- Garbage Matte: Link Matte preset that contains all date related to matte with the new scene.
In the following steps we will delve one by one into these elements.

8. Lets start with Camera Feed
- First Make sure the eye of the layer is On
- Click on the center of the thumbnail
- Next, notice that on the right panel you will have all the details of the camera feed layer. (Understanding Camera Feed Layer)

9. Let's dive into the details of the camera feed layer.
- Click the "Media Input" panel to open it.
- Make sure the "Media Input" feature is enabled.
- Click on the "Media Texture Input" list to see the available SDI inputs. (How to Add SDI inputs to Qimera)
- You can find the SDI input name directly by typing it or selecting it from the list.
- Select the SDI input. In this example, we'll select SDITexture-1

10. Now, let's go to the Chroma Key settings panel.
In Qimera, we can have different Chroma Keys associated with different scenes.
- Open Chorma Key Setting panel
- Select which slot you going to use for you key parameters. for this example let's use Key 1.
- Save the slot

11. Next is Chroma Key Parameters panel
Here you can choose the color for your key and tune it. (How to Set and Tune Chorma key on Qimera)
- Open Chroma Key Parameters panel.
- Switch On Chroma Feature
- Switch On Despill option
- Save

12. At this point you can see how the background and camera feed layer are combined in the composition monitor.
Note: The BG view may not be aligned with the horizon or may be in the wrong position. This is because you are not setting the camera tracking preset at this point.

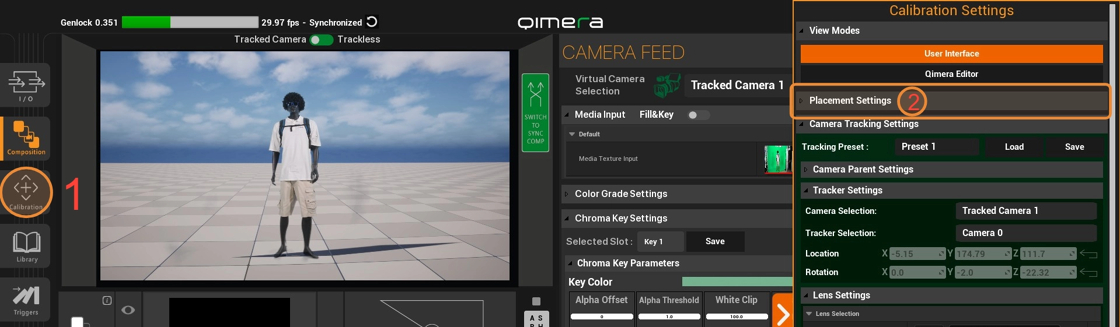
13. Now lets connect you tracking data with the scene
Click in the small gear next to the Virtual Camera selector

14. Please note that the calibration module opens specifically in the camera tracking settings panel. (Understanding Calibration Module)
Here you going to select the Tracking preset accordingly with you tracker input(How to create a Tracking Preset)

15. 1. Go to Tracking Preset and open the list 2. select the preset accordingly with you Camera Tracking System 3. Click in Load
(How to create a Tracking Preset)

16. In this case, preset 1 shows that the tracker selection is Camera 0, which is the tracker ID that Unreal receives via the live link from the tracker system connected to the real camera. (How to connect tracker Data to Livelink)
Additionally, the preset contains the lens file corresponding to your actual camera lens. (How to create a Lens File)

17. Then close The calibration Module

18. Now Let's dive in into Matte or Mask layer setup (Garbage Matte).
- Click the center of the purple thumbnail next to the camera thumbnail.
- Notice that a matte layer details panel appears on the right. Make sure that, in the "Augmented Reality Elements" section, the matte element is included in the layer (How to include and exclude AR elements in a layer)
- Open the matte settings panel by clicking the gear.

19. Please note that the calibration module opens specifically in the Matte settings panel.
In this panel, you need to select the Matte Preset that best suits your scene.
The Matte is typically a virtual representation of the green screen used to hide all elements outside the green screen from the actual video signal.
(How to create a Matte Preset)

20. 1. Select your preset 2. then click Load 3. Close The Calibration Module

21. Notice in the Compositing Monitor that the outer portion of the green screen is still visible at this point. This is because there are still two very important steps remaining.
- Enable Matte Layer
- Invert the mask

22. Now you can see in the Composition monitor how the matte covers the outside of the green wall (Garbage Matte)

23. Now lets set the coordinates of the virtual world to the scene
- Double click in Calibration Module.
- Click on Placement Settings to open the panel.
24. 1. Open Placement Preset list 2. Select the preset that you need for you scene, in this case we going to select "Office" (How to create a Placement Preset) 3. Click on Load 4. Close the Calibration Module

25. At this point you have already connected the four basic elements in your New Scene
Camera Feed
Track System
Coordinates
Garbage Matte

26. You can select yours scene already created into the Scene Selections panel.

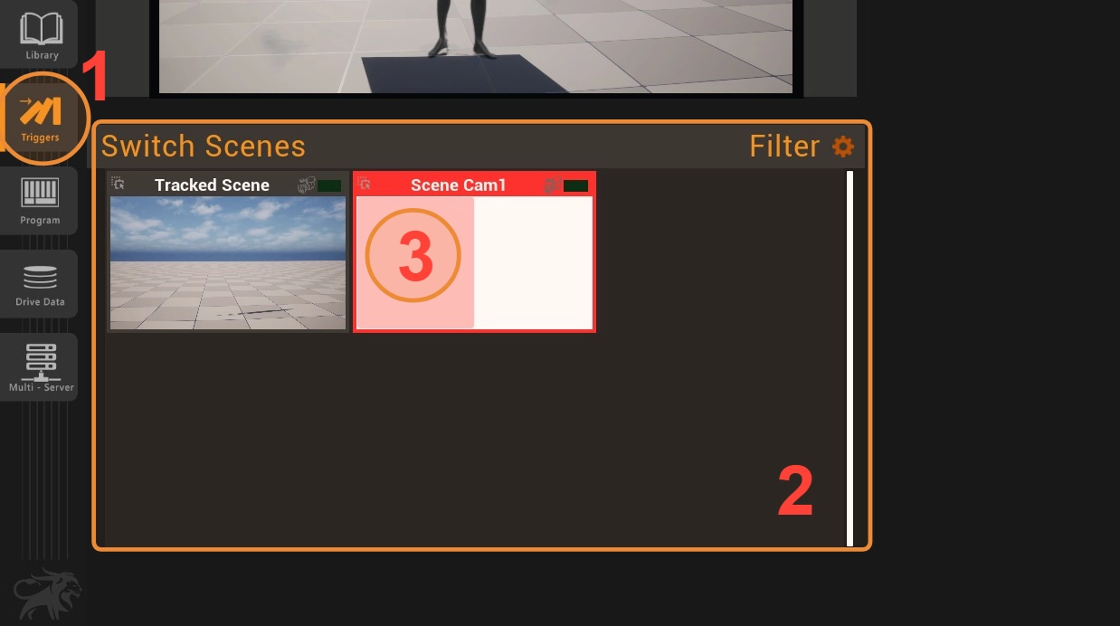
27. Or you can go to the Trigger module and switch between scenes for convenience.
- Click on Trigger Modules Icon
- Check the scenes that you have created so far into the Switch Scenes panel
- Click in the Left side of the Thumbnail of the scene that want to activate
28. Please note that when you switch to another scene, you will have the last frame of the previous scene in the thumbnail of the previous scene.

29. To Delete an scene
- Select the scene you want to delete
- Go to Composition Module

30. 1. Make sure you have selected the scene you want to delete. 2. Click the X icon. 3. A warning panel will appear; click Confirm.

31. If you check the list, the scene you deleted no longer appears.
NOTE: Deleted scenes cannot be recovered

32. Before we move on to creating another scene, let's take some final steps for this particular scene.
- Click on the Composition module.
- Make sure you have the desired scene selected.
- Click on the Compositing Monitor.
- You will see the Compositing Details panel, where you can select and adjust features related to the final output of your scene.
- One of these is the Post-Processing Selection feature: this feature allows you to make adjustments to color correction, exposure, and very important rendering-related features, such as lumen capacity and ray tracing options.
- Another important feature is the SDI Output feature. This is where you will activate your scene's output.
Next we will focus on post-processing and SDI output.

33. If you open the Post Process Selection list and this is empty, that mean that theres not a post process volume in this map or level

34. 1. Press F11 2. Press Escape to close the Qimera Session and go back to the unreal editor.

35. 1. Click on the "Quickly add to the project" button. 2. Go to "Volumes". 3. Select Post Process Volume option. 4. Launch Qimera.

36. 1. Click on the Qimera UI 2. Press F11 to maximize Qimera UI

37. 1. Click on Composition Module 2.
